


Hello beautiful people ! Yes, you read the title correctly. In this article, you will learn how to create a video with React.
It is true that we use few video editing tools to create a video. Imagine creating one with React ? With Remotion, it's now possible to create a video using React.
What is Remotion ?
Remotion is a suite of libraries building a fundament for creating videos programmatically using React. In simple words, you can create animated videos by writing code.
Installation
There are two core dependencies we need to install for Remotion - Node.js and FFmpeg.
With Node.js and FFmpeg installed, you are ready to get started with Remotion.
You can initialize a new Remotion video using
npm init video
or
yarn create video
Additional step for Linux users
Linux users need to install some additional packages to get Chrome/Puppeteer working correctly.
Ubuntu
apt install -y gconf-service libasound2 libatk1.0-0 libc6 libcairo2 libcups2 libdbus-1-3 libexpat1 libfontconfig1 libgcc1 libgconf-2-4 libgdk-pixbuf2.0-0 libglib2.0-0 libgtk-3-0 libnspr4 libpango-1.0-0 libpangocairo-1.0-0 libstdc++6 libx11-6 libx11-xcb1 libxcb1 libxcomposite1 libxcursor1 libxdamage1 libxext6 libxfixes3 libxi6 libxrandr2 libxrender1 libxss1 libxtst6 ca-certificates fonts-liberation libappindicator1 libnss3 lsb-release xdg-utils wget libgbm-dev
Arch Linux
sudo pacman -S dconf alsa-lib atk glibc cairo libcups dbus expat fontconfig gcc gdk-pixbuf2 glib2 gtk3 nspr pango gcc-libs libx11 libxcomposite libxcursor libxdamage libxext libxfixes libxi libxrandr libxrender libxss libxtst ca-certificates ttf-liberation libappindicator-gtk3 nss lsb-release xdg-utils wget mesa
This completes the initialization of your first remotion project, and you can start the project using npm start or yarn start
Fundamentals
Let's look at some Remotion fundamentals in order to create a video.
useVideoConfig provides access to specific information about the video which you are making. It also returns an object which contains video properties so that they can be used across components.
width: The width of the composition in pixels.height: The height of the composition in pixels.fps: The frame rate of the composition, in frames per seconds.durationInFrames: The duration of the composition in frames.
These properties can be used to configure the size of the component in pixels, the frame rate and duration in frames.
useCurrentFrame returns the integer identifying the current frame of the video.
spring function allows you to create beautiful spring animations.
interpolate function allows you to map a range of values to another using a concise syntax, making animations more readable. It takes four input parameters-
- The input value
- The range of values that you expect the input to assume
- The range of output values that you want the input to map to
- Optional parameter
Sequence is a higher order component which allows you to time-shift certain parts of your animation and therefore make them more reusable. It also accepts the following props -
from: A required integer that indicates what frame the sequence starts from. When the sequence is atframe, it's children are at frame0.durationInFrames: The length of sequence component in terms of frames.name: This is an optional prop which will be shown as the label of the sequence in the timeline of the Remotion preview.layout: This is an optional prop that can be eitherabsolute-fillornone. By default, the sequences will be absolutely positioned, so they will overlay each other. You can passnoneto customize the behaviour.
Composition is a component that registers a video to make it renderable and makes it show up in the sidebar of the Remotion player. Besides the two additional props id and component or lazyComponent, it takes the same ones contained in the object returned by useVideoConfig -
id: ID of the composition, as shown in the sidebar and also a unique identifier of the composition that you need to specify if you want to render it. The ID can only contain letters, numbers and-.componentorlazyComponent- This is either the React component with the animation or a function that returns a dynamic import. Passing neither or both of the props is an error.
registerRoot function is the root component of the Remotion project that should return one or more compositions wrapped in a React fragment.
Now that you have a basic understanding of the key properties and components of Remotion, we can begin creating the video.
Creating a Simple Video with Remotion
We will be creating a simple video which displays Hashnode logo and some text with animations.
To begin, create three components as Logo.tsx, Title.tsx and Subtitle.tsx within the src folder.
Logo.tsx
import {interpolate, spring, useCurrentFrame, useVideoConfig, Img, Audio} from 'remotion';

import Icon from './hashnode.png';
import audio from './audio.mp3'

export const Logo: React.FC<{
    transitionStart: number;
}> = ({transitionStart}) => {

    const videoConfig = useVideoConfig();
    const frame = useCurrentFrame();

    const scaleIn = spring({
        frame,
        config: {
            mass: 0.5,
        },
        fps: videoConfig.fps,
    });

    const translation = interpolate(
        spring({
            frame: frame - transitionStart,
            fps: videoConfig.fps,
            config: {
                damping: 100,
                mass: 0.5,
            },
        }),
        [0, 1],
        [0, -100]
    );

    const scale = frame < 50 ? scaleIn : 1;

    return (
        <div
            style={{
                textAlign: 'center',
                marginTop: '15%',
                width: videoConfig.width,
                height: videoConfig.height,
                transform: `scale(${scale}) translateY(${translation}px)`
            }}
        >
            <Img src={Icon} />
            <Audio src={audio} />
        </div>
    );
};
This component uses the spring parameters and the interpolate helper function in conjunction with the scaleIn and translation spring functions to create the animation.
Using the Audio component, you can add audio to your video. All audio formats which are supported by Chromium are supported by the component.
Title.tsx
import {spring, useCurrentFrame, useVideoConfig} from 'remotion';

import "./font.css";

export const Title: React.FC<{
    titleText: string;
    titleColor: string;
}> = ({titleText, titleColor}) => {
    const videoConfig = useVideoConfig();
    const frame = useCurrentFrame();
    const text = titleText.split(' ').map((t) => ` ${t} `);
    return (
        <h1
            style={{
                fontFamily: 'Inter',
                fontWeight: 'bold',
                fontSize: 100,
                textAlign: 'center',
                position: 'absolute',
                bottom: 200,
                width: '100%',
            }}
        >
            {text.map((t, i) => {
                return (
                    <span
                        key={t}
                        style={{
                            marginLeft: 10,
                            marginRight: 10,
                            transform: `scale(${spring({
                                fps: videoConfig.fps,
                                frame: frame - i * 5,
                                config: {
                                    damping: 100,
                                    stiffness: 100,
                                    mass: 0.5,
                                },
                            })})`,
                            display: 'inline-block',
                        }}
                    >
                        {t}
                    </span>
                );
            })}
        </h1>
    );
};
This component takes in two props - titleText and titleColor. titleText is translated into an array using the text function. The text.map function renders each word separately using a spring animation.
You can use custom fonts by loading them in a CSS file using @font-face. Web fonts often ship with a CSS file declaring the fonts, which you can import using the @import statement.
Subtitle.tsx
The Subtitle component also animates text along with the interpolate function.
import {interpolate, useCurrentFrame} from 'remotion';

import "./font.css";

export const Subtitle: React.FC = () => {
    const frame = useCurrentFrame();
    const opacity = interpolate(frame, [0, 30], [0, 1]);
    return (
        <div
            style={{
                fontFamily: 'Inter',
                fontWeight: 500,
                fontSize: 45,
                textAlign: 'center',
                position: 'absolute',
                bottom: 140,
                width: '100%',
                opacity,
            }}
        >
            Start blogging with Hashnode today
            <span
                style={{
                    color: '#2962ff',
                    fontWeight: 700
                }}
            >
                 hashnode.com
            </span>
        </div>
    );
};
Sequence
We have now completed setting up our base components, so we can use them in sequences and compositions to create our final video. We use sequences, as mentioned above, to time-shift and arrange all the components of a video.
Create a component named DemoVideo.tsx and import the three above components and wrap them with the Sequence component.
import {interpolate, Sequence, useCurrentFrame, useVideoConfig} from 'remotion';
import {Logo} from './Logo';
import {Title} from './Title';
import {Subtitle} from './Subtitle';

export const DemoVideo: React.FC<{
    titleText: string;
    titleColor: string;
}> = ({titleText, titleColor}) => {
    const frame = useCurrentFrame();
    const videoConfig = useVideoConfig();

    const opacity = interpolate(
        frame,
        [videoConfig.durationInFrames - 25, videoConfig.durationInFrames - 15],
        [1, 0],
        {
            extrapolateLeft: 'clamp',
            extrapolateRight: 'clamp',
        }
    );
    const transitionStart = 25;

    return (
        <div style={{flex: 1, backgroundColor: 'white'}}>
            <div style={{opacity}}>
                <Sequence from={0} durationInFrames={videoConfig.durationInFrames}>
                    <Logo transitionStart={transitionStart} />
                </Sequence>
                <Sequence from={transitionStart + 10} durationInFrames={Infinity}>
                    <Title titleText={titleText} titleColor={titleColor} />
                </Sequence>
                <Sequence from={transitionStart + 50} durationInFrames={Infinity}>
                    <Subtitle />
                </Sequence>
            </div>
        </div>
    );
};
Each sequence has a different from value, which indicates its position on the timeline in the combined clip, which will contain all three animated components.
Composition
Next, by using the Composition we can render our clips into MP4 files and make them available for viewing in Remotion's player.
Create a component called Video.tsx and import the components to be registered. Each component is fed into the Composition component under a respective component prop.
Include all the video properties as well as any additional props. Wrap all the compositions in a single React fragment, and import it into the root component index.tsx.
Video.tsx
import {Composition} from 'remotion';
import {DemoVideo} from './DemoVideo';
import {Logo} from './Logo';
import {Title} from './Title';
import {Subtitle} from './Subtitle';

export const RemotionVideo: React.FC = () => {
    return (
        <>
            <Composition
                id="DemoVideo"
                component={DemoVideo}
                durationInFrames={150}
                fps={30}
                width={1920}
                height={1080}
                defaultProps={{
                    titleText: 'I ❤️ Hashnode',
                    titleColor: '#333333',
                }}
            />
            <Composition
                id="Logo"
                component={Logo}
                durationInFrames={200}
                fps={30}
                width={1920}
                height={1080}
            />
            <Composition
                id="Title"
                component={Title}
                durationInFrames={100}
                fps={30}
                width={1920}
                height={1080}
                defaultProps={{
                    titleText: 'Welcome to Remotion',
                    titleColor: 'black',
                }}
            />
            <Composition
                id="Subtitle"
                component={Subtitle}
                durationInFrames={100}
                fps={30}
                width={1920}
                height={1080}
            />
        </>
    );
};
index.tsx
import {registerRoot} from 'remotion';
import {RemotionVideo} from './Video';

registerRoot(RemotionVideo);
In your browser when you run the application by running npm start, you will see a video player, where different compositions can be played individually.
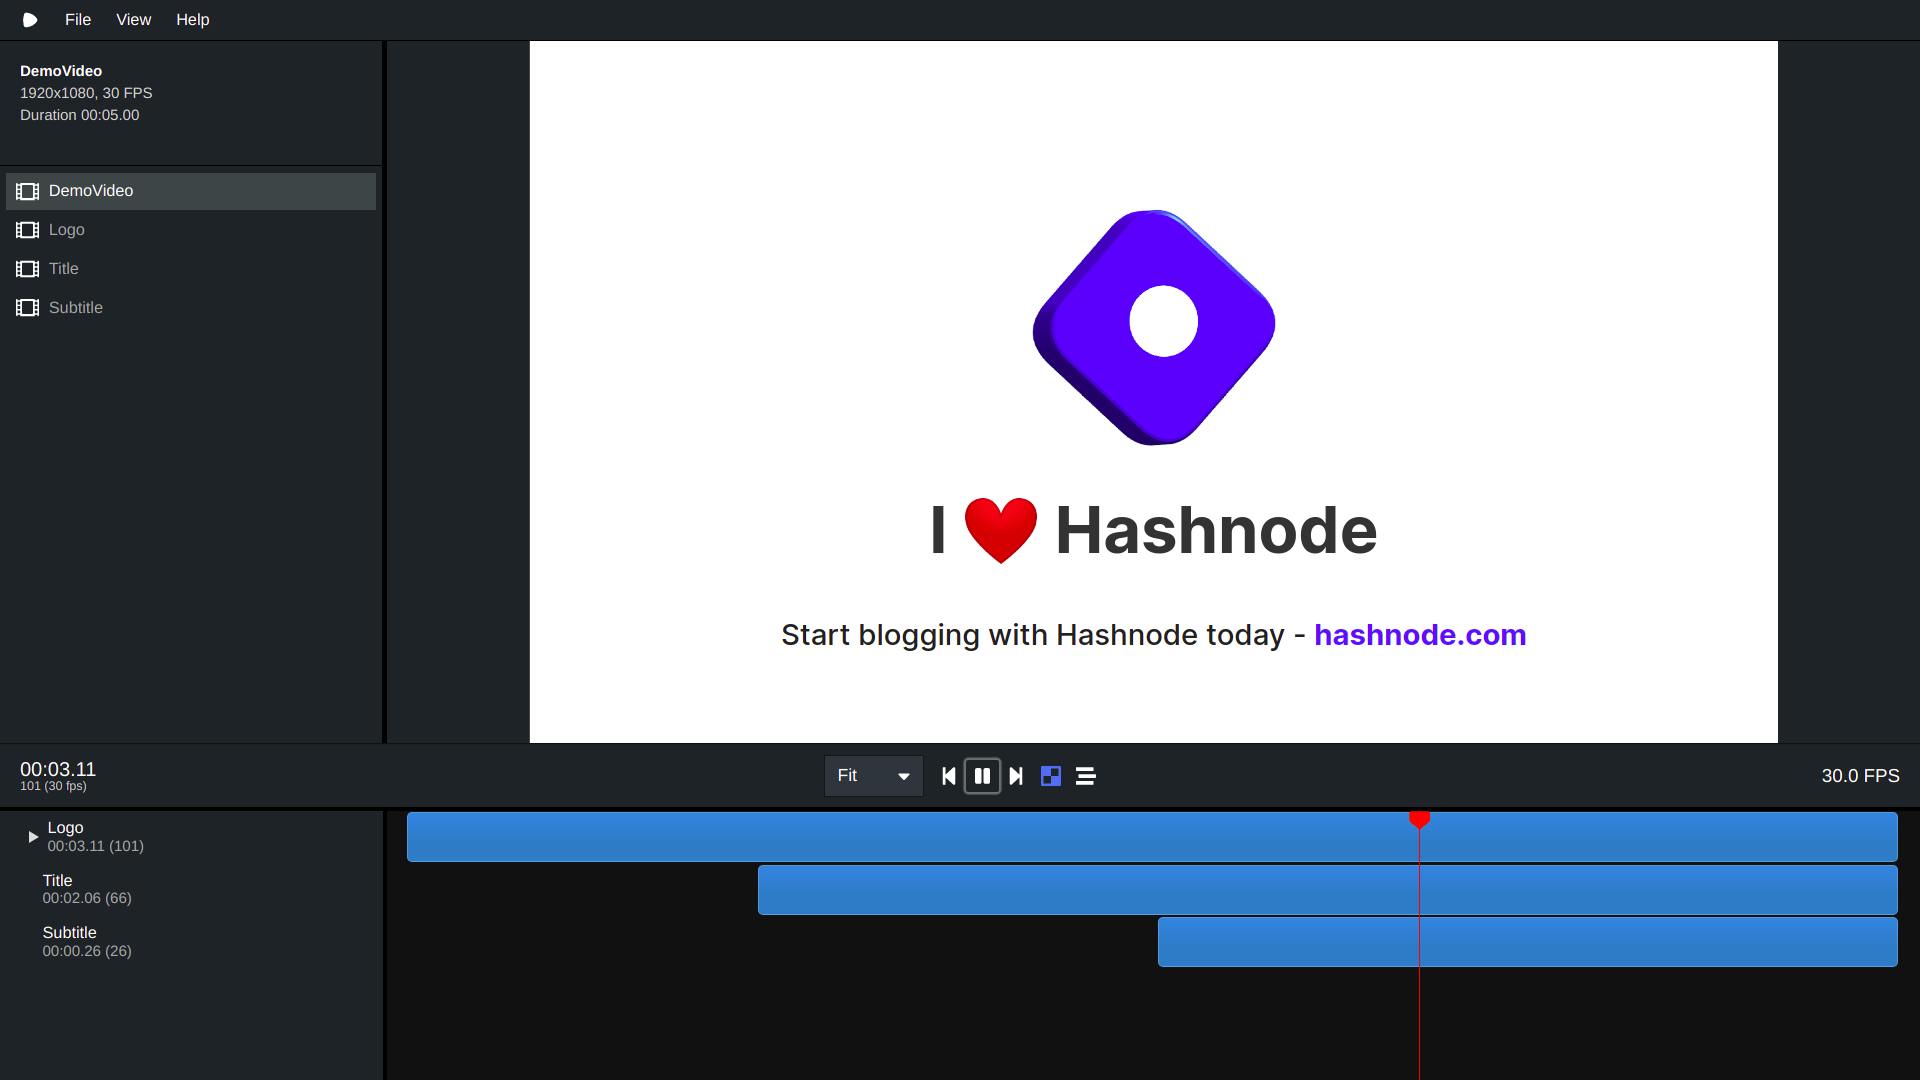
You can play and pause your videos in the Remotion player and see where each animation fits in the timeline. You can also adjust the video view according to your preferences.
Render and export your final video by running -
npm run build
or
yarn build
This runs the underlying command in package.json -
npx remotion render src/index.tsx HelloWorld out/video.mp4
Voila, you just created a video with React.
Conclusion
Remotion is an incredible tool created by Jonny Burger. It blew my mind the first time I heard about it. You should definitely give it a try. It's an open-source project too.
Visit remotion.dev and Jonny Burger's YouTube Channel to learn more about Remotion.
Thank you for reading the article. Till then, be happy and stay safe.
Happy Coding 🚀